Thursday, August 27, 2009

Tuateawa Bird Spot: New Zealand Pipit.


Pipits used to be quite common in Tuateawa and a few can still be found today. They are a bird of open country and can most often be encountered running away from you as you walk along a gravel road. Characteristically they have a bobbing motion of the tail and, when they fly, white tail feathers can be seen. They are not wildly attractive as they need good camouflage to both feed and nest on the ground.

Their diet consists largely of invertebrates and small seeds. The new pastures opened up by the early colonists were ideal for this bird. Today farmland is more rigorously managed and pesticides reduce the amount of insect life available. Even so this is a native bird that is not in serious decline.

In Tuateawa numbers seem to be down, it could well relate to the loss of grazing pressure. The open pastures with many different plant species have mostly been replaced with inpenetrable kikuyu grass in recent years. Recent subdivision work seems to have recreated a small amount of their habitat for them and it is a good place to seek them out. They are more frequent around Waikawau where farming methods have maintained a larger habitat for them.

Skylarks used to be a Tuateawa feature. Like the pipit they are also ground feeders. I wonder if they are still around? It seems to be quite a while since I can recall hearing a lark!

Friday, August 21, 2009

Tuateawa Mud Oven: A few details.


Every project has points where decisions need to be made. Having to use local materials can require a bit of improvisation and it is hard to avoid tinkering a bit with someone else's plans! This oven has a number of features that differ from the Te Radar version. Some worked but not all of them!

I was concerned that cutting out the oven door after building the oven could turn out to be a total disaster so I tried something a little different. I needed a former.Three-ply sheets are thin, flexible and cheap. I used strips of this material to define both the foundation and also the interior of the oven (the base of the sand dome). The former for the oven entrance needed a very tight curve bent into the ply. To get the greater flexibility I put a strip of 3ply into a bath of hot water for a few minutes. Bending the curve was then very easy and I secured it in place with a loop of string until it dried out.

Inserting ordinary ceramic tiles into the base of the oven did not work out at all. The intense heat cracked and shattered these tiles. Terracotta tiles are much thicker and would have worked fine.

Not all clays are created equal, colour and consistency vary. All clays will shrink as they lose moisture and some crumble more than others. It is worth a few experiments to find a suitable and locally abundant clay. Adding one part of cement to eight parts clay, according to a local guru, will help to consolidate the clay. As the clay dries out the shrinkage can cause cracking, particularly as the sand dome will prevent the oven shrinking as a single unit. Keeping it moist in between building stages should minimise cracking if you use clay without cement.

The oven has three clay layers. The first is to store heat, the second thicker layer is an insulation layer to reduce heat loss. Both the second and third layers incorporate plant material for insulation and consolidation purposes. All the references say that straw is the ideal material for the middle layer. Since this isn't available in Tuateawa an alternative is needed. We found that chopped up dead cabbage tree leaves were a reasonable substitute and also the finer parts of nikau fronds. Dead kikuyu is also a possibility but you would need to spray a patch a month or so in advance. The outer protective layer needs finer plant material. Traditionally this has been pre-processed by a cow! Shredded or torn up newspaper, soaked for several days in advance, is sometimes used. Mixing it with the clay might be difficult. You can use a concrete mixer for this and all the previous mixing but it does seem a bit high tech. and could present it's own difficulties.

The chimney hole needs a former. I used a large can with both ends removed.

It takes more than a single firing to reach peak efficiency with the oven. A lot of energy is used up initially just drying the oven out. Some build a shelter over the oven to keep it dry but this seems a bit difficult in a region where horizontal rain is not unusual. A tarp works quite well and stops the oven returning to it's constituent parts!

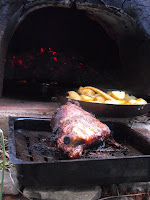
Te Radar suggests raking out all the embers before attempting to cook. Pushing the embers to the back is safer and works well. A spark arrester of crumpled up chicken wire placed in the chimney is also effective.

Cooking with the oven is a skill that is gradually acquired. Initially the heat is eyebrow scorchingly intense. It moderates over a number of hours so things can be cooked sequentially.The major difference from any other oven is that it cooks largely by radiation and the most intense heat comes from above. A sheet of silver foil placed over food is essential in preventing food becoming a bit charred. Knowing this it is possible to produce incredibly flavoured food. Roast pork with perfect crackling and pizzas the equal of any Italian pizzeria!

Thursday, August 20, 2009

Tuateawa Mud Oven


One thing that Tuateawa does not lack is mud. It's price is right and there really isn't much more needed to make a mud oven. It is a rewarding process, as we found out last summer, when we built our own. It does require a reasonable time input but, if you do have that time, it will reward you in satisfaction and financial savings. We were encouraged by seeing the mud oven built by Te Radar on TVNZ. The instructions are downloadable from the TVNZ website and are both understandable and fairly complete. We also found an excellent book, probably Te Radar's source, called Build Your Own Earth Oven by Keiko Denzer. This was available in our local library. There are also many articles on the internet and some useful videos on Utube.

Mistakes are fairly likely in any new project. Luckily the technology involved is both simple and fairly forgiving so you can fix mistakes if you recognise them in time. Equipment requirements are also fairly minimal. Lacking a trailer we collected mud in old paint buckets. We used a spade/shovel to move mud around. A wheel barrow was used to mix mud and water and long rubber gloves were needed in the building process. A concrete float for smoothing and also a level and measuring tape were essential.

As there are such good instructions available elsewhere there seems little point in repeating them here. I am quite happy to accept responsibility for my own mistakes, it's something I've become used to over the years! However I would prefer not to feel guilty over the mistakes of others!The images included should be taken as a guide only. They show the main stages in construction. The overall structure though is a bit different from the Te Radar version. It works very well but has not yet stood the test of time! There are things that I have learned since it was built that I could include in a later post, for those interested.

Forming the level base
Making the sand dome
Sand dome covered with wet paper before mud applied
First mud layer
Three layers of mud
The finished oven has a diameter of 1.5m. and an height of 75cm. The internal space is 1m. in diameter and 50 cm in height. There are two openings, the oven entry is 32 cm in height. There is also a chimney vent at the top and toward the back. It took two people about twenty hours each over the course of five days to build the oven. Then a few days were allowed to pass before the sand dome which supported the oven during construction was removed.
After the sand removed
The oven did not collapse! You do get quite a sense of achievement producing an unsupported dome, even if it only spans a metre!
First firing
After an initial firing up to consolidate it many meals have been produced, stews, roasts, bread and many pizzas!

Friday, August 14, 2009

Tuateawa Plant Spot; Renga Renga Lily.


This must be one of the iconic NZ native plants. It grows just about anywhere, tolerates full sun or dry shade, even extreme coastal conditions. It is widely used in mass plantings, in traffic islands, municipal gardens and for landscaping private homes.

In Tuateawa, in the wild, it is making quite a comeback and can be found from shoreline to the top of Whanake, but always in rocky situations. The major factor in it's decline in the natural environment being it's food value. It is thought to have been gathered and also cultivated by early Maori, the fleshy rhizomes being edible when cooked. In the wild the introduced browsing animals would have consumed the leafy plants and the feral pigs would have eaten leaves and rooted up the rhizomes as well. This is possibly why it has come to be known as The NZ Rock Lily. Only in the rocks would it have been possible for the rhizomes to have survived from the rooting and grazing pressure. Feral pigs still exist in Tuateawa but the goats have been gone for over a decade and the cattle not much less. The Renga Renga Lily is starting to thrive again.

Tuesday, August 11, 2009

Tuateawa Spring.


The days have been getting longer for a good seven weeks now. The coldest month has gone. Winter is not yet a distant memory but there are plenty of signs of Spring! Clematis is coming into bloom in favoured locations as are some varieties of plum tree.

In the shag colony young birds are being fed, or helping themselves whilst many of the mature birds are sitting on eggs.

The quail are a little reduced in numbers over the winter and are not pairing up just yet. The kaka continue to hoon across the sky. It is usual for kaka to lay eggs in August and there does seem to be at least one couple that travel together.

On Waikawau Beach the NZ dotterel are paired up and defending territories. This image is of a banded dotterel being driven away by a NZ dotterel.


The Kowhai buds are swelling and should start to flower in another couple of weeks. Then we will know that Spring has really arrived!

Tuesday, August 4, 2009

Tuateawa Bird Spot: Californian Quail.


Quail are quite a feature of Tuateawa. Unaware of the fact that they are a very tasty game bird they are quite trusting and almost domesticated. They quickly come to expect the provision of bird food and it is possible to hand feed them, particularly the chicks.

Being ground nesting they do have major problems with mammalian predation. Fortunately each nest that survives will contain a dozen or more eggs. Accumulating this many eggs could take more than a fortnight. Even so, they will all hatch within a couple of hours of each other. It is thought that the chicks coordinate their hatching by cheeping to each other whilst they are still in the egg. Once hatched they are instantly mobile and self feeding. The male parent is usually on watch while the chicks feed. They run and hide when warned but within three weeks they can also fly a bit. Family groups often combine, sometimes including unpaired males and this adds another layer of protection for the chicks. Competition between breeding pairs is gradually replaced by cooperation. Come winter the birds forage together in quite large coveys.
Like many NZ birds quail have been introduced. The first birds were introduced in Nelson in 1865. This was very successful. By 1890 there were so many quail they were being canned and exported!
Introduced species can often have severe negative effects on native plants and animals. There doesn't seem to be any indication of this in the literature in relation to quail. Our only native quail was on the verge of extinction before the Californian Quail was introduced. If you are a gardener you will be less favourably inclined. Quail do like a daily dust bath and, being largely vegetarian, do enjoy pecking away at young seedlings. It is also noticeable that large numbers of Tobacco Weed/ Woolly Nightshade seedlings can be found where quail congregate.